
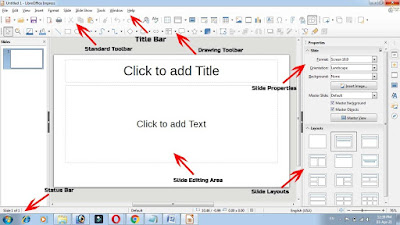
LibreOffice Impress
Presentation Software एक एप्लीकेशन सॉफ्टवेयर है जिसकी User Slides बनाकर अपनी प्रेजेंटेशन को Present करते है. ठीक उसी तरीके से Libreoffice Impress में भी Slides बनाकर प्रेजेंटेशन को Present किया जाता है. इसमें सुचनायो को Slides Format में कुछ मल्टीमीडिया विशेषताओ जैसे फोटो एवं आवाज़ के साथ Open, Create, Edit, Formatting, Share एवं Print आदि करने का कार्य करता है.

Presentation Software निम्न प्रकार के हो सकते है.
- Microsoft Powerpoint
- Open Office
- Google Documents
- LibreOffice Impress
Home Menu
EDIT MENU
Function Keys for LibreOffice Impress
Shortcut Keys | Effect |
F2 | Edit text. |
F3 | Enter Group. |
Ctrl+F3 | Exit Group. |
Shift+F3 | Duplicate |
F4 | Position and Size |
F5 | View Slide Show. |
Ctrl+Shift+F5 | Navigator |
F7 | Spelling |
Ctrl+F7 | Thesaurus |
F8 | Edit Points. |
Ctrl+Shift+F8 | Fit text to frame. |
F11 | Styles |
Shortcut Keys in Slide Shows
| |||||||||||||||||||||||||
|
Ctrl+Enter |
Soft hyphens; hyphenation set by you. |
|
Ctrl+Shift+F5 |
Non-breaking hyphen (is not used for hyphenation) |
|
Ctrl+Shift+F5 |
Non-breaking spaces. Non-breaking spaces are not used for
hyphenation and are not expanded if the text is justified. |
|
Shift+Enter |
Line break without paragraph change |
|
Arrow Left |
Move cursor to left |
|
Shift+Arrow Left |
Move cursor with selection to the left |
|
Alt Key |
Go to beginning of word |
|
Alt+Shift+click |
Selecting to the left word by word |
|
Arrow Right |
Move cursor to right |
|
Shift+Arrow Right |
Move cursor with selection to the right |
|
Alt+Page Up |
Go to start of next word |
|
Alt+Shift+click |
Selecting to the right word by word |
|
Arrow Up |
Move cursor up one line |
|
Shift+Arrow Up |
Selecting lines in an upwards direction |
|
Alt+Page Up |
Move cursor to beginning of the previous paragraph |
|
Arrow Down |
Move cursor down one line |
|
Shift+Arrow Down |
Selecting lines in a downward direction |
|
Alt+Page Down |
Move cursor to end of paragraph. Next keystroke move cursor to
end of next paragraph |
|
F11 |
Go to beginning of line |
|
F11 |
Go and select to the beginning of a line |
|
F11 |
Go to end of line |
|
F11 |
Go and select to end of line |
|
Ctrl+F3 |
Go to start of text block in slide |
|
Ctrl+F3 |
Go to end of text block in slide |
|
Alt Key |
Delete text to end of word |
|
Alt+Page Up |
Delete text to beginning of word In a list: delete an empty paragraph in front of the current
paragraph |
|
Ctrl+Shift+F5 |
Delete text to end of sentence |
|
Ctrl+Shift+F5 |
Delete text to beginning of sentence |
Shortcut Keys in the Normal View
Shortcut Keys | Effect |
Plus(+) Key | Zoom in. |
Minus(-) Key | Zoom out. |
Times(×) Key (number pad) | Fit page in window. |
Divide(÷) Key (number pad) | Zoom in on current selection. |
Shift+Ctrl+G | Group selected objects. |
Shift+Ctrl+Alt+A | Ungroup selected group. |
Ctrl+ click | Enter a group, so that you can edit the individual objects of the group. Click outside the group to return to the normal view. |
Ctrl+Shift+K | Combine selected objects. |
Ctrl+Alt+Shift+K | Split selected object. This combination only works on an object that was created by combining two or more objects. |
Ctrl+ Plus key | Bring to Front. |
Shift+Ctrl+ Plus key | Bring Forward. |
Ctrl+ Minus key | Send Backward. |
Shift+Ctrl+ Minus key | Send to Back. |
Shortcut Keys for LibreOffice Impress
|
Shortcut Keys |
Effect |
|
Arrow key |
Moves the selected object or the page view in the direction of
the arrow. |
|
Ctrl+ Arrow Key |
Move around in the page view. |
|
Shift + drag |
Constrains the movement of the selected object horizontally or
vertically. |
|
Ctrl+drag(withCopywhen moving option active) |
Hold down Ctrl and drag an object to create a copy of
the object. |
|
Alt Key |
Hold down Alt to draw or resize objects by dragging from
the centre of the object outward. |
|
Alt key+click |
Select the object behind the currently selected object. |
|
Alt+Shift+click |
Select the object in front of the currently selected object. |
|
Shift+click |
Select adjacent items or a text passage. Click at the start of a
selection, move to the end of the selection, and then hold down Shift while
you click. |
|
Shift+drag (when resizing) |
Hold down Shift while dragging to resize an object to maintain
the proportions of the object. |
|
Tab key |
Select objects in the order in which they were created. |
|
Shift+Tab |
Select objects in the reverse order in which they were created. |
|
Escape |
Exit current mode. |
|
Enter |
Activate a placeholder object in a new presentation (only if the
frame is selected). |
|
Ctrl+Enter |
Moves to the next text object on the slide. If there are no text objects on the slide, or if you reached the
last text object, a new slide is inserted after the current slide. The new
slide uses the same layout as the current slide. |
|
PageUp |
Switch to the previous slide. No function on the first slide. |
|
PageDown |
Switch to the next slide. No function on the last slide |


0 Comments
Hello Guys Post Aap ko kesi Lagi Jarur bataye or post Share jarur kare